My Ideas for the Blog and Current Projects
I’ve moved rooms which means I’ll be organizing and redoing furniture, etc, and I thought it was the perfect way to start the blog. I’ve tried several times, unsuccessfully, to keep some sort of blog or social media account, but I never quite got the hang of it. I also didn’t have enough energy at the time to keep up with one because of some medical issues, but lately I’ve improved and wanted to start up again.
I also started keeping a sort of log notebook. Keeping a journal never did it for me, but sometimes it’s hard to do something just because (e.g. sketches just for practice that will never be seen) and then have nothing to show for it. It created the strange illusion that even though I was feeling better, I hadn’t gotten anything done, when in fact I just went through a series of “invisible” (e.g. learning how to program, etc.) and/or failed projects. So I dug out this old Moleskine I’d never truly found a use. For years I couldn’t get myself to use it. I finally decided to hell with it and started using it almost a year ago to record ideas when I went out, but it’s sat mostly unfilled. But anyways I took it and just started to write down everything I did each day. It’s been two months, which is dozens of times longer than I’ve managed to stay with any other sort of journal like thing, and it’s evolved quite nicely. I’ve added a small to-do list in the back and there’s a series of symbols so I can also write down notes, ideas, and supply places/prices. The last one might sound kind of strange, but it serves two purposes. First, where I live there’s super high inflation and it’s very hard to find art related supplies. Just in the time I’ve started using the thing for notes which is less than a year, there’s evidence in there of colored pencil prices doubling. Second, some of the names for materials/tools are very different, they might go by the technical name, by a brand specific to my country, or the translation might just seem illogical to me, and in a lot of places, everything is behind the counter, something which I wasn’t used to, so you have to know what to ask for.
Point is I want to do something similar with the blog, hence the name, and then at most set up a youtube to post some videos to accompany it (maybe some tutorials, I used to do those, but they’re a pain to record and edit). Unlike my personal-everything-goes log though, it will be more focused, so to speak. I can’t believe I didn’t make the connection earlier, but I realized maybe I should approach blogging in the same way I realized years ago I should approach my writing (novels): imagining my audience as being the reader side of me, like the alternate universe version of me that was never a writer (it can’t be just me me or there’d be very little criteria for what to keep/cut since I would enjoy the story regardless), and that’s it. No feedback unless I’m nearly finished or I’m really stuck. No leaving things in or cutting things out because I feel x person might like it more/less.
It really helped with pinning down what I wanted with my writing so I thought why not do the same with my blog? I’ll only post mostly-finished or need-to-be-finished things, the sort of things I like to read about, and write and share them the way I like to see them shared. My RSS feed of art/diy blogs is huge and the more detail oriented the better. I love medium length articles. In this day and age people tend to want the quick version of things, but I feel trying to satisfy that would be compromising too much. In the end, I’d rather a few readers that actually read and enjoy the same style blogs I do, then hundreds that don’t.
I’m also very much a perfectionist and much like with my writing in the beginning, with blogs and such I had the problem where I’d post WIPs, put them on hold, look back, especially at drawing WIPs, and think they looked awful and so quit on them. On the one hand it can be nice to see your progress (mostly my experience has been to cringe though), but on the other hand sometimes doing stuff that will never get seen and will just get deleted or thrown away at the end takes off any pressure to not fail, and the failing is going to happen, it needs to happen, and it’s much nicer and easier to let go and fail in a controlled environment without pressure. Basically doing it for the sake of doing it and learning to enjoy that process regardless of the outcome really really helps in my case (apart from creating a habit, which is the other half of the equation).
The log helps fix the lack of a good progress record that doing this creates, but I’ve also found there aren’t as many gaps as I expected. Since I’ve been doing more things, there’s a higher output and therefore more things that meet my expectations, and not just that, but when I’m finished I find myself caring less about any mistakes I find later because since I designated the project as practice, the result almost always exceeds my zero expectations.
Later on once I’ve mastered the basics, high attention to detail can really help my works, and that’s probably why I was never too keen to let that side of me go, but usually that’s definitely not the case at the beginning, and it just becomes a fruitless attempt to satisfy the perfectionist in me. I know I can’t possibly expect to do something to my satisfaction on the first try (though it often exceeds others’ expectations which just seems to frustrate me more), but getting my brain to not freak out has always been a problem. And it was never helped by the fact that I’d take on projects I couldn’t possibly hope to master the skills I needed to complete them for months or years to come.
Doing the above has forced me to start with smaller projects. For example, I’d been wanting to get back into 3D modeling again for a while, but I wasn’t sure about what program to go with. I had worked with Autodesk 3Ds Max and Architecture before and was leaning towards Autodesk programs. They have a free 3 year student version that might as well be unlimited given they release a new version every year. I actually did get 3ds Max, but I must have has a better mouse back when I first tried it because I just couldn’t stand the middle mouse for panning and didn’t like the other arrangements it offered. Then of course there’s Blender which is completely free, but I remembered it being horribly confusing and uncomfortable so although that’s where I’ll probably end up in the end, I didn’t want to start with it because I was sure it would crush my returning interest. Then a friend recommended C4D, even let me try it on their computer. It costs and arm and a leg and unfortunately only technically has a 45 day trial (with saving, unlimited without). I should seriously make a chart. But anyways C4D was amazing. way easier to understand than anything I’d ever tried, I could get it much closer to my ideal shortcut layout, and its interface is one of the most intuitive and customizable I’ve ever seen. But I digress, onto my point.
Before, I would have wanted to start with something like a short (at least I knew better than to aim for a movie) or model/rig an entire character in full detail as the first project (I know, insane). I had actually done a realistic 3d head, but that was in Sculptris (free) which had maybe a 1 day learning curve, and even then that took 100+ hours.
So, this time I didn’t even attempt to animate anything or do anything larger than a head in terms of detail. I chose something relatively simple, but that would keep my interest, and that was an Iron Man helmet. Not too detailed, not exact (although that was kind of decided for me when I couldn’t find good orthographic views). Only the mouth piece moves. The back is kind of iffy. I didn’t know and still don’t know how to texture remotely well or do lights. But what I did learn which had until then mystified me, was point modeling (not starting with a shape). I also got really familiar with the modeling tools much quicker than I would have had I attempted something that involved more than modeling, part of that was using C4D, but most of it was choosing something simple to work on. And once I was familiar with which tools I used the most (took about a day) I dedicated some time to tweaking the interface and mapping the shortcuts to my left hand. Something which I found with Photoshop improved my workflow at least 25% for most things, and probably 50% for tasks that involve a lot of switching between tools/panels. I now hardly have any panels open, just a canvas, options bar, and tool bar (because there isn’t another way to keep track of fg/bg colors). I switch between most things with shortcuts. Doing this early on in C4D allowed me to improve even faster after that first day and let me focus on learning 3D modeling techniques.
I delete ALL the default shortcuts by the way, so that in case I forget what’s what, I can just press keys until I get the correct tool without accidentally pressing some obscure commands. It can then take a few weeks/months to truly finalize a layout (and consequently learn a program), editing it when anything gets uncomfortable, but it’s really worth it, even if you’ll just be using a program for a month. You can always save the config even if it’s a trial. I wouldn’t bother if it’s less time, you won’t be using it intensively, you didn’t like the program, or if it’s really really hard to set them (unless you need to use it for a long time), but otherwise it’s really worth it. I’ll make a post about the process when I get around to doing this for Blender.
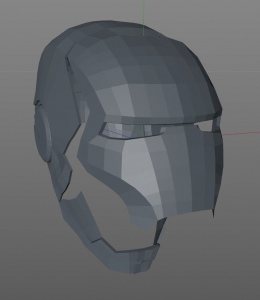
Iron Man Helmet - Front - Jaw Open
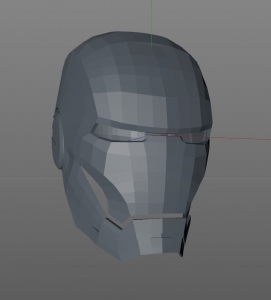
Iron Man Helmet - Front
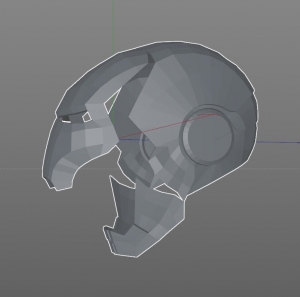
Iron Man Helmet - Side - Jaw Open
The helmet took 3-4 days, so about 30 hours of work, with various attempts at each part, not because they weren’t perfect, but more because I realized the way I approached them was wrong. When that happened, I’d just delete and restart. Had it been something else with more similar parts I might have just skipped some, but each part of the mask was an exercise in something completely different (e.g. face needed to have eyes but I needed to keep with the good habit of few triangles, the jaw needed that extruded edge that merged in later, the back needed to be shaped around that circle, and also layered in 3 parts, and then it all needed to fit/seal correctly). If I got tired of the mask, I could have just left it and moved on. Strangely enough I “finished” it. Just a few weeks later I can now see even more things I would have approached differently, but I’ve stopped seeing those things as mistakes or wanting to go back and fix it. For practice, it was great practice and really fun.
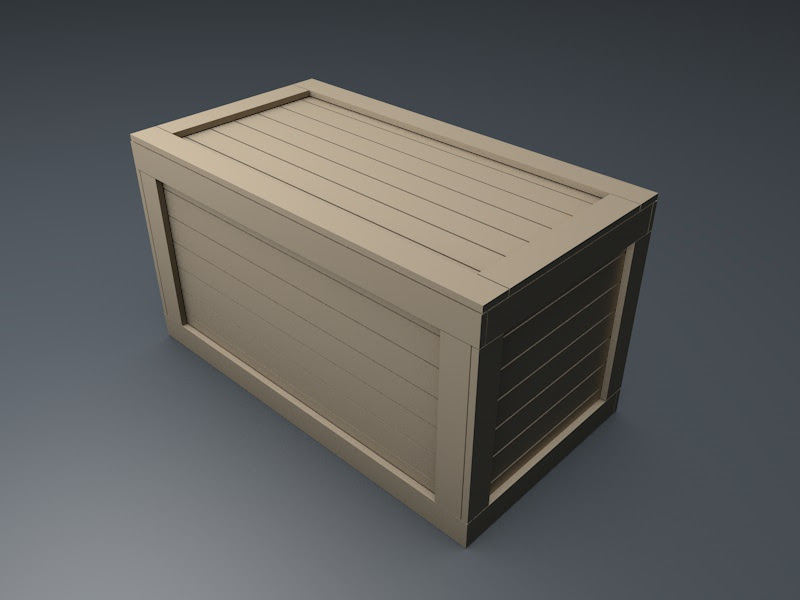
Wooden Chest 3D Model
After that I did a chest.
This is a real wooden chest I’m making btw. My dad got a bunch of old dirty wooden boards (the type that make up roofs) and I’ve been wanting to make a wooden chest for a long time. For any furniture I’ve always preferred to model stuff out instead of doing it on paper. It also offered the perfect chance to learn more about C4D’s awesome system of Mograph tools. (I’m talking about the booles, cloner, array, etc). I was semi-familiar with them, but I’ve now gotten to know all their settings, the best way to go about cloning things, how to combine objects (which had really confused me before), etc. Cloning especially made it really easy to change the size of the chest as needed. I only had a certain number of boards for me and I needed to plan it so I had enough. I couldn’t take the measurements completely from the model only because the boards weren’t perfect and some ended up a few millimeters longer than others when I cut them thinner. I still had to start from the bottom, mark, cut, then make my way up, measuring as I go for certain boards, but the model made it much easier to plan and visualize. There was also the problem at first that even though I cleaned and sanded the boards, some still had some mold stains, but only on one part of the board (less than half), which meant if I planned right, those could all go on the bottom. In the end I planned it so well I had quite a few left over boards so I redid all the moldy ones and left those for a different project. I’m thinking of making a rotational caster (I’m thinking similar to this one) with them, there’s more than enough for one, but not for something like another box.
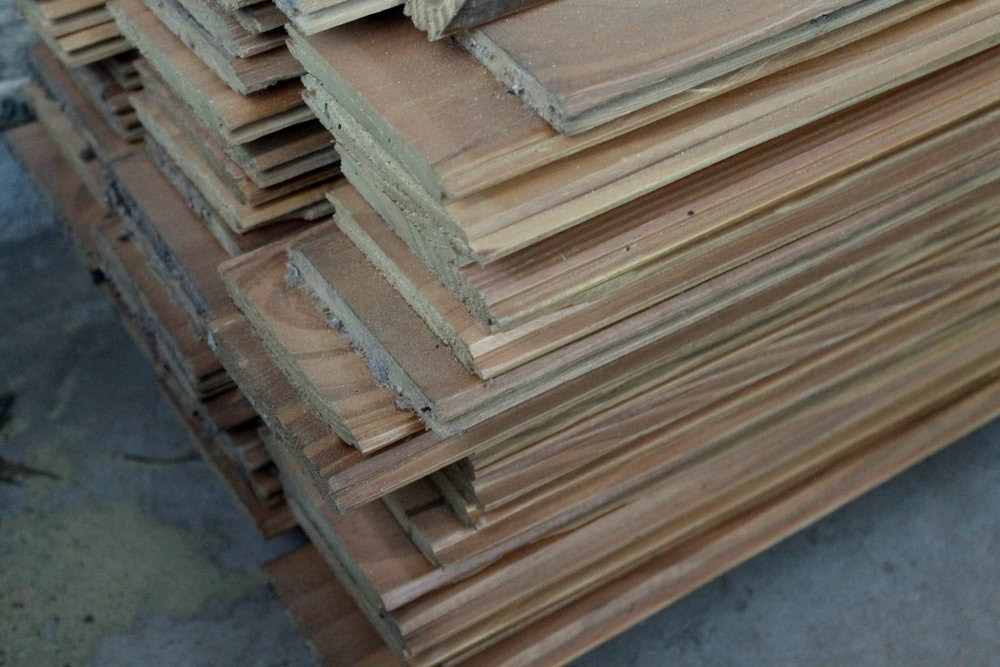
Used Wooden Boards
These are the other boards that my dad’s going to be making some sort of bench out of later. This is what mine looked like before. As you can see they were stained on one side (darker than it looks), but both sides needed sanding anyways because even the non-moldy ones were dirty/rough. They were also too wide, and still have those interlocking sides. And then below is how bad the mold looked on most of the bad boards, some were even worse.
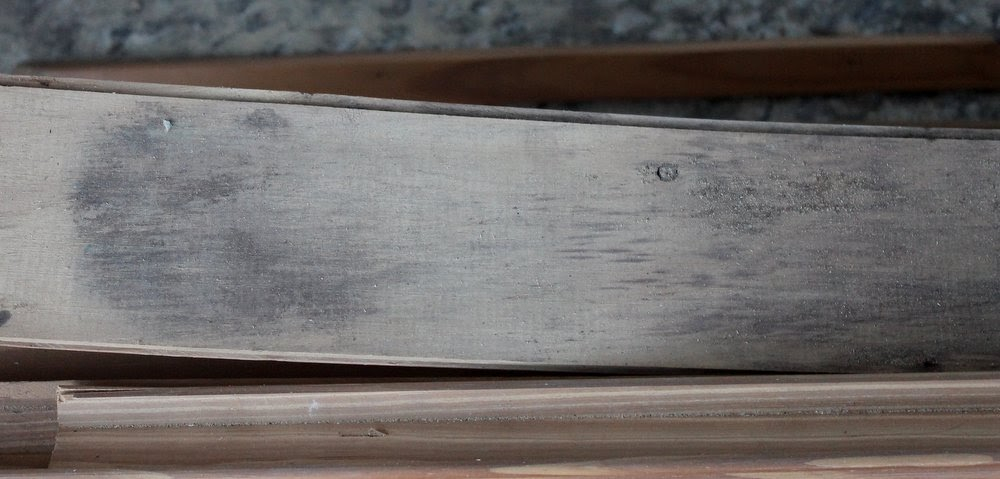
Wooden Boards - Mold Growth Example
And here are mine after, interlocking edges trimmed, cut in half along their length, sanded on both sides and the edges with 60 grit sandpaper (I didn’t like how the sharp edges looked against each other).
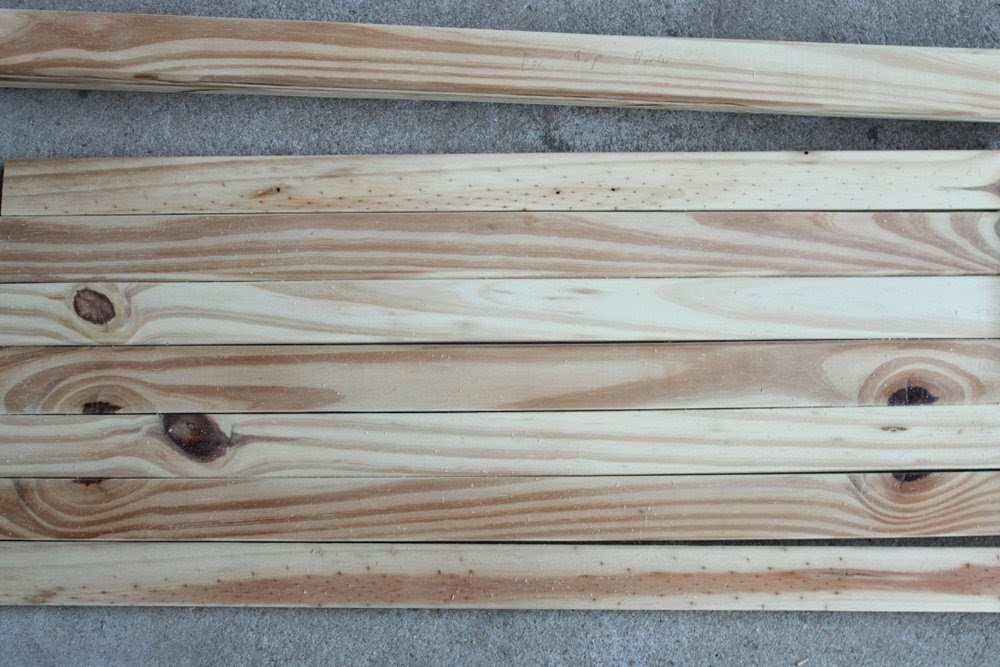
Wooden Boards - Cut and Sanded
Below is one of the moldy ones (which I ended up redoing) which I also cleaned with some bleach. You can hardly tell in the picture (ignore the yellow tone btw, it was just in different light) but next to the clean ones or side by side with the rest of the moldy ones it was very obvious. They were okay for doing the bottom which wouldn’t be seen, or as I’m now planning, something like the rotational caster which doesn’t need to be pretty.

Wooden Boards - Bad Boards
I just finished cutting them all today. Once I put all the pieces together I’ll do a post on it.
Back to 3d modeling. I also tried to do an X-Wing. That one didn’t go well, but only because the orthographic images I found (from the Star Wars Vehicles book) are just ever so slightly off. So I either have to fix them, or even better, draw it up myself from scratch from reference images, so I think I’ll leave it for later since I also want to scratch build it from plastic. I can just make one set of drawings for both those things.
Since I still wanted to practice doing a ship though, I tried coming up with one from scratch instead. I messed around with a few designs. Still haven’t got anything good, but I’m taking the chance to learn how to make materials and mess with the render settings which are really what make a model come to life. The actual modeling part is only half the battle.
In the meantime I set up another reality based model. Like I said in the beginning I’m basically setting up the room I moved to from scratch. I have a desk, a few Andy drawers, and a bookcase, but everything else is in boxes and it’s just a mess. I used to have two desks, the Andy drawers, and one of those giant Ikea things with cubes where I put my collection of things and books. Now most of my things are in the attic. It’s been a while since the move that landed them there because of space issues so I’d really like to display everything again. Best way to test out configurations was a 3D model, so I measured the entire room and modeled it and the basic starting furniture. I got the configuration mostly down, but there’s still some details that I’m not sure about. I got some pretty cool ideas though, design wise. Plus it seems I will be sticking to one desk for various reasons, so I made a bunch of modifications to make better use of the space while keeping it clean and having everything on hand (which are the main problems for me with just having one desk). I think it’s better to wait until they’re finally implemented though, maybe do a video.
So that’s 2 things I “finished” out of 5 in two months which is quite a lot for me, even compared to the times I felt semi-well health wise a few years back. And that’s just the 3d models, it’s not counting other things I’ve been doing that I haven’t mentioned.
Anyways, I’ll try to post on a weekly basis. That’s my goal for now. Next time I might split the post along the week though since I tend to write a lot and my upcoming projects will have more details. Not as in more writing (this was more of an introductory post), but more instructions/pictures. It takes too much space to record how I went about a project on my personal log. Usually I’d save my messy notes to my computer, which are later a pain to decipher, so I might clean those up for the blog and use it as a log in that sense as well. I thought about using instructables which I love, but that would be yet another site to manage. Maybe I’ll write posts there first, we’ll see.