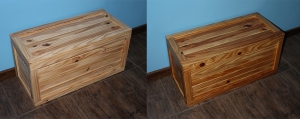
<?xml version="1.0" encoding="utf-8"?>
<feed xml:lang="en-US" 
xmlns:media="http://search.yahoo.com/mrss/" 
xmlns:content="http://purl.org/rss/1.0/modules/content/"
xmlns="http://www.w3.org/2005/Atom">
    
        
            <link href="https://alansartlog.com/tags/diy/rss/index.xml" rel="self" type="application/atom+xml"  />
            <title>Alan&#39;s Art Log - Tag:diy</title>
            <link type="text/html" href="https://alansartlog.com/tags/diy" rel="alternate"/>
            <id>https://alansartlog.com/tags/diy</id>
        
    
    <subtitle>Paintings, sketches, tutorials, videos, and art related DIY projects.</subtitle>
    <category term="Art"></category>
    <icon>https://alansartlog.com/resources/images/pencil-logo-icon-150x150.jpg</icon>
    
    <updated>2019-02-16T23:35:34+00:00</updated>
    <author>
        <name>Alan North</name>
        <email>alansartlog@gmail.com</email>
    </author>

    
    <rights>© Copyright 2017-2019 Alan North - All rights reserved unless otherwise stated.</rights>

    
        <entry>
    
    <title>Quick Tip - How to Tighten Tripod Legs</title>
    <link href="https://alansartlog.com/2016/11/tripod-quick-tip"/>
    <id>https://alansartlog.com/2016/11/tripod-quick-tip</id>


        <content type="html"><![CDATA[<iframe src="https://www.youtube.com/embed/qLNLrjWVCGo?autoplay=1" frameborder="0" allowfullscreen></iframe>
<p>I didn't finish the video I really wanted to do (on sculpting with polymer clay) so this is just a quick tip. It won't work for all tripods, but it should work for most of the ones that use hinges to tighten the legs.</p>
<p><a class="read-more" href="/2016/11/tripod-quick-tip">Read More…</a></p>]]></content>
    
    <link rel="service.post" type="text/html" href="https://alansartlog.com/2016/11/tripod-quick-tip#disqus_thread" title="Comment"/>
    
        <category term="https://alansartlog.com/tags/diy" label="diy"></category>
    
        <category term="https://alansartlog.com/tags/lifehacks" label="lifehacks"></category>
    
        <category term="https://alansartlog.com/tags/recordingediting-tools" label="recording/editing tools"></category>
    
        <category term="https://alansartlog.com/tags/toolssoftware" label="tools/software"></category>
    
    
    <updated>2016-11-17T17:38:57+00:00</updated>
</entry>

    
        <entry>
    
    <title>How to Make a Stay Wet Palette to Keep Your Paints Wet</title>
    <link href="https://alansartlog.com/2016/08/how-to-make-a-stay-wet-palette-to-keep-your-paints-wet"/>
    <id>https://alansartlog.com/2016/08/how-to-make-a-stay-wet-palette-to-keep-your-paints-wet</id>


        <content type="html"><![CDATA[<iframe src="https://www.youtube.com/embed/wac6PYpG9JM?autoplay=1" frameborder="0" allowfullscreen></iframe>]]></content>
    
    <link rel="service.post" type="text/html" href="https://alansartlog.com/2016/08/how-to-make-a-stay-wet-palette-to-keep-your-paints-wet#disqus_thread" title="Comment"/>
    
        <category term="https://alansartlog.com/tags/acrylics" label="acrylics"></category>
    
        <category term="https://alansartlog.com/tags/art-supplies" label="art supplies"></category>
    
        <category term="https://alansartlog.com/tags/diy" label="diy"></category>
    
        <category term="https://alansartlog.com/tags/videos" label="videos"></category>
    
    
    <updated>2016-08-06T23:09:18+00:00</updated>
</entry>

    
        <entry>
    
    <title>How to Keep Acrylic Paints Wet - Retarders</title>
    <link href="https://alansartlog.com/2016/07/how-to-keep-acrylic-paints-wet-retarders"/>
    <id>https://alansartlog.com/2016/07/how-to-keep-acrylic-paints-wet-retarders</id>


        <content type="html"><![CDATA[<iframe src="https://www.youtube.com/embed/lBqsvsB-MHw?autoplay=1" frameborder="0" allowfullscreen></iframe>
<p>The adhesion test video is in the next post.</p>
<p>
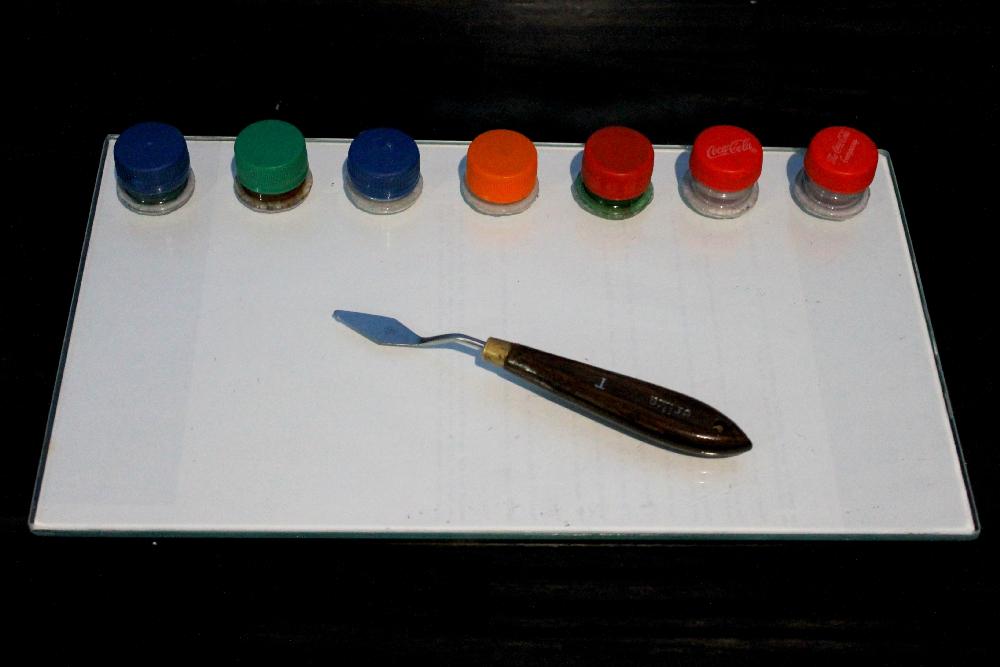
This was the chart I kept for the drying tests. Temperatures were around 12 C for those days like I mentioned in the video. Probably around 20 C inside, maybe less (heater is off at night).</p>
<iframe  width="100%" height="500px" src="https://docs.google.com/spreadsheets/d/12bUVXSpKfcfQCfM-nRmwihCF_hj48uhKCzD9H3okfFU/pubhtml?gid=0&amp;single=true&amp;widget=true&amp;headers=false"></iframe>
<p>Regarding the "watercolors" I know I called them a watercolor substitute, but it's more like they've substituted watercolors for me specifically because they're slower drying, portable, and won't crack. But they're more like something between gouache and oils and yet they have a distinct sticky feel (like warm honey). They're more opaque then watercolors, but they stay wet longer, and yet they have that tendency to stay in that sticky watercolor stage on paper. My mix is about 1:1, more and they flow too much, less and they'd dry in the box because it's not airtight (if the box were airtight I could use less).</p>
<p>I also like them because I can paint at the consistency they're at without accidently over diluting them with water like I usually do watercolors. For example, for a sky, I'll outline the object, then I'll go back on the paper and spread the color around with a water-brush there.</p>
<p>One thing I forgot to mention is that you should use professional grade acrylics for them if you want them to keep their opacity. Additionally if you like gouache you can mix in a bit of titanium white with all your colors to make the even more opaque.</p>
<p>I will do a video with them in the future.</p>]]></content>
    
    <link rel="service.post" type="text/html" href="https://alansartlog.com/2016/07/how-to-keep-acrylic-paints-wet-retarders#disqus_thread" title="Comment"/>
    
        <category term="https://alansartlog.com/tags/acrylics" label="acrylics"></category>
    
        <category term="https://alansartlog.com/tags/art-supplies" label="art supplies"></category>
    
        <category term="https://alansartlog.com/tags/diy" label="diy"></category>
    
        <category term="https://alansartlog.com/tags/videos" label="videos"></category>
    
    
    <updated>2016-07-22T23:11:31+00:00</updated>
</entry>

    
        <entry>
    
    <title>How to Clean Paint Stuck in the Ferrule of a Paintbrush</title>
    <link href="https://alansartlog.com/2016/05/how-to-clean-paint-stuck-in-the-ferrule-of-a-paintbrush"/>
    <id>https://alansartlog.com/2016/05/how-to-clean-paint-stuck-in-the-ferrule-of-a-paintbrush</id>


        <content type="html"><![CDATA[<iframe src="https://www.youtube.com/embed/bAPX2LKFHe8?autoplay=1" frameborder="0" allowfullscreen></iframe>]]></content>
    
    <link rel="service.post" type="text/html" href="https://alansartlog.com/2016/05/how-to-clean-paint-stuck-in-the-ferrule-of-a-paintbrush#disqus_thread" title="Comment"/>
    
        <category term="https://alansartlog.com/tags/art-supplies" label="art supplies"></category>
    
        <category term="https://alansartlog.com/tags/diy" label="diy"></category>
    
        <category term="https://alansartlog.com/tags/toolssoftware" label="tools/software"></category>
    
        <category term="https://alansartlog.com/tags/videos" label="videos"></category>
    
    
    <updated>2016-05-15T23:35:23+00:00</updated>
</entry>

    
        <entry>
    
        <media:thumbnail url="https://alansartlog.com//resources/uploads/modified-andy-drawers.jpg"/>
        
    
    <title>Modifying IKEA Andy Drawers</title>
    <link href="https://alansartlog.com/2016/01/modifying-ikea-andy-drawers"/>
    <id>https://alansartlog.com/2016/01/modifying-ikea-andy-drawers</id>


        <content type="html"><![CDATA[<p>You can also find this post as an <a href="http://www.instructables.com/id/Modifying-IKEA-Andy-Drawers/">instructable</a>.</p>
<p>I’ve had four Andy Drawers (two red, two grey) for years. They’re great. I really like them because they’re really light and portable but at the same time they do have some problems. The first is the dust. This wasn’t so bad before but now I live somewhere really dusty and I had to stop storing any sort of paper in them because they’d get all gross. The second is that if you happened to get the ones with a matte finish (grey), the drawers don’t slide nearly as nicely as with the glossy ones.</p>
<p>Lastly, only two really fit under my desk, I can’t see anything when I go search for something, I bump into them with my chair all the time, and the other two are always in the way when I don’t need them, and too far when I do. So apart from fixing the first two problems I’ve also decided to put them one on top of the other both to save space and fix the light problem.</p>
<p><a class="read-more" href="/2016/01/modifying-ikea-andy-drawers">Read More…</a></p>]]></content>
    
    <link rel="service.post" type="text/html" href="https://alansartlog.com/2016/01/modifying-ikea-andy-drawers#disqus_thread" title="Comment"/>
    
        <category term="https://alansartlog.com/tags/diy" label="diy"></category>
    
    
    <updated>2016-01-21T00:00:00+00:00</updated>
</entry>

    
        <entry>
    
        <media:thumbnail url="https://alansartlog.com//resources/uploads/push-stick-01.jpg"/>
        
    
    <title>Better Table Saw Push Stick from Scrap Wood</title>
    <link href="https://alansartlog.com/2016/01/better-table-saw-push-stick-from-scrap-wood"/>
    <id>https://alansartlog.com/2016/01/better-table-saw-push-stick-from-scrap-wood</id>


        <content type="html"><![CDATA[<p>You can also find this post as an <a href="http://www.instructables.com/id/Better-Table-Saw-Push-Stick-From-Scrap-Wood/">instructable</a>.</p>
<p>I’ve also submitted this instructable to the <a href="http://www.instructables.com/contest/leftovers/">Leftovers Challenge contest</a> over there, so please vote for it if you like it.</p>
<p><a class="read-more" href="/2016/01/better-table-saw-push-stick-from-scrap-wood">Read More…</a></p>]]></content>
    
    <link rel="service.post" type="text/html" href="https://alansartlog.com/2016/01/better-table-saw-push-stick-from-scrap-wood#disqus_thread" title="Comment"/>
    
        <category term="https://alansartlog.com/tags/diy" label="diy"></category>
    
        <category term="https://alansartlog.com/tags/toolssoftware" label="tools/software"></category>
    
        <category term="https://alansartlog.com/tags/woodworking" label="woodworking"></category>
    
    
    <updated>2016-01-07T00:00:00+00:00</updated>
</entry>

    
        <entry>
    
        <media:thumbnail url="https://alansartlog.com//resources/uploads/modified-can.jpg"/>
        
    
    <title>Easily Pour Paint from Small Cans</title>
    <link href="https://alansartlog.com/2015/12/easily-pour-paint-from-small-cans"/>
    <id>https://alansartlog.com/2015/12/easily-pour-paint-from-small-cans</id>


        <content type="html"><![CDATA[<p>You can also find this post as an <a href="http://www.instructables.com/id/Easily-Pour-Paint-From-Small-Cans/">Instructable</a></p>
<h1 id="smallupdate">Small Update</h1>
<p>I’d hoped to have my drawers done by now but they’ve taken longer than planned even though I’ve been working an average of one hour a day for a month, which is incredibly productive given my state. The structure is finished but it’s the little details that are taking a long time. I don’t want to stop posting completely though so in the meantime I’ll be making a few posts about the things I did to make the project easier on myself. These will technically be posted in reverse order that I made them because I only have the prototypes now, I didn’t actually make the finished tools.</p>
<p>Also since figuring out a method to get paid I’ve been working on creating a Patreon, and getting a YouTube channel set up and everything so I’ve been very busy. It’s not done yet, but if you want to support me check it out&nbsp;and/or share my posts.</p>
<h1 id="paintcans">Paint Cans</h1>
<p>We all know what a pain it is to pour paint out. I tried to google to see if there was some sort of life hack for this but found none so I made my own. I honestly don’t even know why we still use cans shaped like they are. I get not using plastic because the metal is probably easier to recycle and more resistant (plus it keeps out light), but surely they could add better lids. This isn’t so much a problem on big cans for me, so this solution doesn’t work for them. With bigger cans you usually need to use large amounts at once and you tend to use the can all at once (say to paint a room) so controlling the amount isn’t such a problem. But with small cans this works great and I’m sure you could modify this to something larger if you find a large enough bottle, or you could pour larger cans into smaller empty ones and reuse them if say you bought something in bulk but only use a small amount at a time.</p>
<p><a class="read-more" href="/2015/12/easily-pour-paint-from-small-cans">Read More…</a></p>]]></content>
    
    <link rel="service.post" type="text/html" href="https://alansartlog.com/2015/12/easily-pour-paint-from-small-cans#disqus_thread" title="Comment"/>
    
        <category term="https://alansartlog.com/tags/diy" label="diy"></category>
    
        <category term="https://alansartlog.com/tags/lifehacks" label="lifehacks"></category>
    
        <category term="https://alansartlog.com/tags/toolssoftware" label="tools/software"></category>
    
    
    <updated>2015-12-12T00:00:00+00:00</updated>
</entry>

    
        <entry>
    
        <media:thumbnail url="https://alansartlog.com//resources/uploads/varnished-chest.jpg"/>
        
    
    <title>Varnished Chest</title>
    <link href="https://alansartlog.com/2015/11/varnished-chest"/>
    <id>https://alansartlog.com/2015/11/varnished-chest</id>


        <content type="html"><![CDATA[<p>I’ve been busy with a big project so in the meantime, here’s the chest again. I finally varnished it with a polyurethane matt (or semi-gloss?) varnish. I thinned it down and gave it two coats. It came out really nice except for in a few places there was extra glue I hadn’t seen and wiped off so the varnish looks white there. You can’t really tell, but it’s something I’m keeping in mind for my next project and others that require a lot of glue.</p>
<figure>

<div class="lazy-wrapper"><img is_thumb="true" src="https://alansartlog.com/resources/uploads/varnished-chest-before-and-after-300x119.jpg"  width="300" height="119"  alt="Varnished%20Chest%20Before%20and%20After"/></div><figcaption><p>Before/After</p></figcaption></figure>]]></content>
    
    <link rel="service.post" type="text/html" href="https://alansartlog.com/2015/11/varnished-chest#disqus_thread" title="Comment"/>
    
        <category term="https://alansartlog.com/tags/diy" label="diy"></category>
    
        <category term="https://alansartlog.com/tags/woodworking" label="woodworking"></category>
    
    
    <updated>2015-11-18T00:00:00+00:00</updated>
</entry>

    
        <entry>
    
        <media:thumbnail url="https://alansartlog.com//resources/uploads/bottle-cap-palette-1.jpg"/>
        
    
    <title>Bottle Cap Palette</title>
    <link href="https://alansartlog.com/2015/10/bottle-cap-palette"/>
    <id>https://alansartlog.com/2015/10/bottle-cap-palette</id>


        <content type="html"><![CDATA[<p>This post is also available as an <a href="http://www.instructables.com/id/Bottle-Cap-Palette-Save-Keep-Paints-Wet/">instructble</a>.</p>
<p><div class="lazy-wrapper"><img src="https://alansartlog.com/resources/uploads/bottle-cap-palette-1.jpg"  width="1000" height="667"  alt="Bottle Cap Palette 1" /></div></p>
<p>I added a piece of paper so you can see the glass better.&nbsp;I plan on adding contact paper and painting the back gray.</p>
<p><a class="read-more" href="/2015/10/bottle-cap-palette">Read More…</a></p>]]></content>
    
    <link rel="service.post" type="text/html" href="https://alansartlog.com/2015/10/bottle-cap-palette#disqus_thread" title="Comment"/>
    
        <category term="https://alansartlog.com/tags/acrylics" label="acrylics"></category>
    
        <category term="https://alansartlog.com/tags/art-supplies" label="art supplies"></category>
    
        <category term="https://alansartlog.com/tags/diy" label="diy"></category>
    
        <category term="https://alansartlog.com/tags/toolssoftware" label="tools/software"></category>
    
    
    <updated>2015-10-21T00:00:00+00:00</updated>
</entry>

    
        <entry>
    
        <media:thumbnail url="https://alansartlog.com//resources/uploads/finished-closed.jpg"/>
        
    
    <title>Wooden Chest</title>
    <link href="https://alansartlog.com/2015/09/wooden-chest"/>
    <id>https://alansartlog.com/2015/09/wooden-chest</id>


        <content type="html"><![CDATA[<p>In this post I'll be showing you how I made the wooden chest.</p>
<p><a class="read-more" href="/2015/09/wooden-chest">Read More…</a></p>]]></content>
    
    <link rel="service.post" type="text/html" href="https://alansartlog.com/2015/09/wooden-chest#disqus_thread" title="Comment"/>
    
        <category term="https://alansartlog.com/tags/3d" label="3d"></category>
    
        <category term="https://alansartlog.com/tags/3d-model" label="3d model"></category>
    
        <category term="https://alansartlog.com/tags/diy" label="diy"></category>
    
        <category term="https://alansartlog.com/tags/woodworking" label="woodworking"></category>
    
    
    <updated>2015-09-11T00:00:00+00:00</updated>
</entry>

    
        <entry>
    
        <media:thumbnail url="https://alansartlog.com//resources/uploads/tripod-easel.jpg"/>
        
            <media:description type="html">&lt;p&gt;Tripod Easel&lt;/p&gt;</media:description>
        
    
    <title>Converting a Camera Tripod into an Easel</title>
    <link href="https://alansartlog.com/2015/09/converting-a-camera-tripod-into-an-easel"/>
    <id>https://alansartlog.com/2015/09/converting-a-camera-tripod-into-an-easel</id>


        <content type="html"><![CDATA[<p>I’m poor and cheap so there's no way I would ever spend money on an art easel. I might make one someday, but I’ve never actually worked on one. I was just curious as to the experience, so yet another reason to not spend a bunch of money on something I might never use again.</p>
<p>Plus I have an easel looking thing, what other reason do I need to mess with my tripod?</p>
<p>Perhaps I shouldn’t say that. No tripods were harmed in this process.</p>
<p><a class="read-more" href="/2015/09/converting-a-camera-tripod-into-an-easel">Read More…</a></p>]]></content>
    
    <link rel="service.post" type="text/html" href="https://alansartlog.com/2015/09/converting-a-camera-tripod-into-an-easel#disqus_thread" title="Comment"/>
    
        <category term="https://alansartlog.com/tags/diy" label="diy"></category>
    
        <category term="https://alansartlog.com/tags/toolssoftware" label="tools/software"></category>
    
        <category term="https://alansartlog.com/tags/woodworking" label="woodworking"></category>
    
    
    <updated>2015-09-04T00:00:00+00:00</updated>
</entry>

    
        <entry>
    
    <title>My Ideas for the Blog and Current Projects</title>
    <link href="https://alansartlog.com/2015/07/my-ideas-for-the-blog-and-current-projects"/>
    <id>https://alansartlog.com/2015/07/my-ideas-for-the-blog-and-current-projects</id>


        <content type="html"><![CDATA[<p>I’ve moved rooms which means I’ll be organizing and redoing furniture, etc, and I thought it was the perfect way to start the blog. I’ve tried several times, unsuccessfully, to keep some sort of blog or social media account, but I never quite got the hang of it. I also didn’t have enough energy at the time to keep up with one because of some medical issues, but lately I’ve improved and wanted to start up again.</p>
<p>I also started keeping a sort of log notebook. Keeping a journal never did it for me, but sometimes it’s hard to do something just because (e.g. sketches just for practice that will never be seen) and then have nothing to show for it. It created the strange illusion that even though I was feeling better, I hadn’t gotten anything done, when in fact I just went through a series of “invisible” (e.g. learning how to program, etc.) and/or failed projects. So I dug out this old Moleskine I’d never truly found a use. For years I couldn’t get myself to use it. I finally decided to hell with it and started using it almost a year ago to record ideas when I went out, but it’s sat mostly unfilled. But anyways I took it and just started to write down everything I did each day. It’s been two months, which is dozens of times longer than I’ve managed to stay with any other sort of journal like thing, and it’s evolved quite nicely. I’ve added a small to-do list in the back and there’s a series of symbols so I can also write down notes, ideas, and supply places/prices. The last one might sound kind of strange, but it serves two purposes. First, where I live there’s super high inflation and it’s very hard to find art related supplies. Just in the time I’ve started using the thing for notes which is less than a year, there’s evidence in there of colored pencil prices doubling. Second, some of the names for materials/tools are very different, they might go by the technical name, by a brand specific to my country, or the translation might just seem illogical to me, and in a lot of places, everything is behind the counter, something which I wasn’t used to, so you have to know what to ask for.</p>
<p><a class="read-more" href="/2015/07/my-ideas-for-the-blog-and-current-projects">Read More…</a></p>]]></content>
    
    <link rel="service.post" type="text/html" href="https://alansartlog.com/2015/07/my-ideas-for-the-blog-and-current-projects#disqus_thread" title="Comment"/>
    
        <category term="https://alansartlog.com/tags/3d" label="3d"></category>
    
        <category term="https://alansartlog.com/tags/3d-model" label="3d model"></category>
    
        <category term="https://alansartlog.com/tags/diy" label="diy"></category>
    
        <category term="https://alansartlog.com/tags/fanart" label="fanart"></category>
    
        <category term="https://alansartlog.com/tags/woodworking" label="woodworking"></category>
    
    
    <updated>2015-07-26T00:00:00+00:00</updated>
</entry>

    
</feed>
