Some Notes on Ears - Part 2
You can also find this post as an Instructable.
I finally got around to complete Part 2 of the Ears video. I’m still having some recording issues. If you have any questions please comment. Feedback is appreciated. I worked on cutting down the time to 15 minutes this time. Currently working on trying to sound less monotone.
First Part: How to Draw Ears - Part 1 - Structure
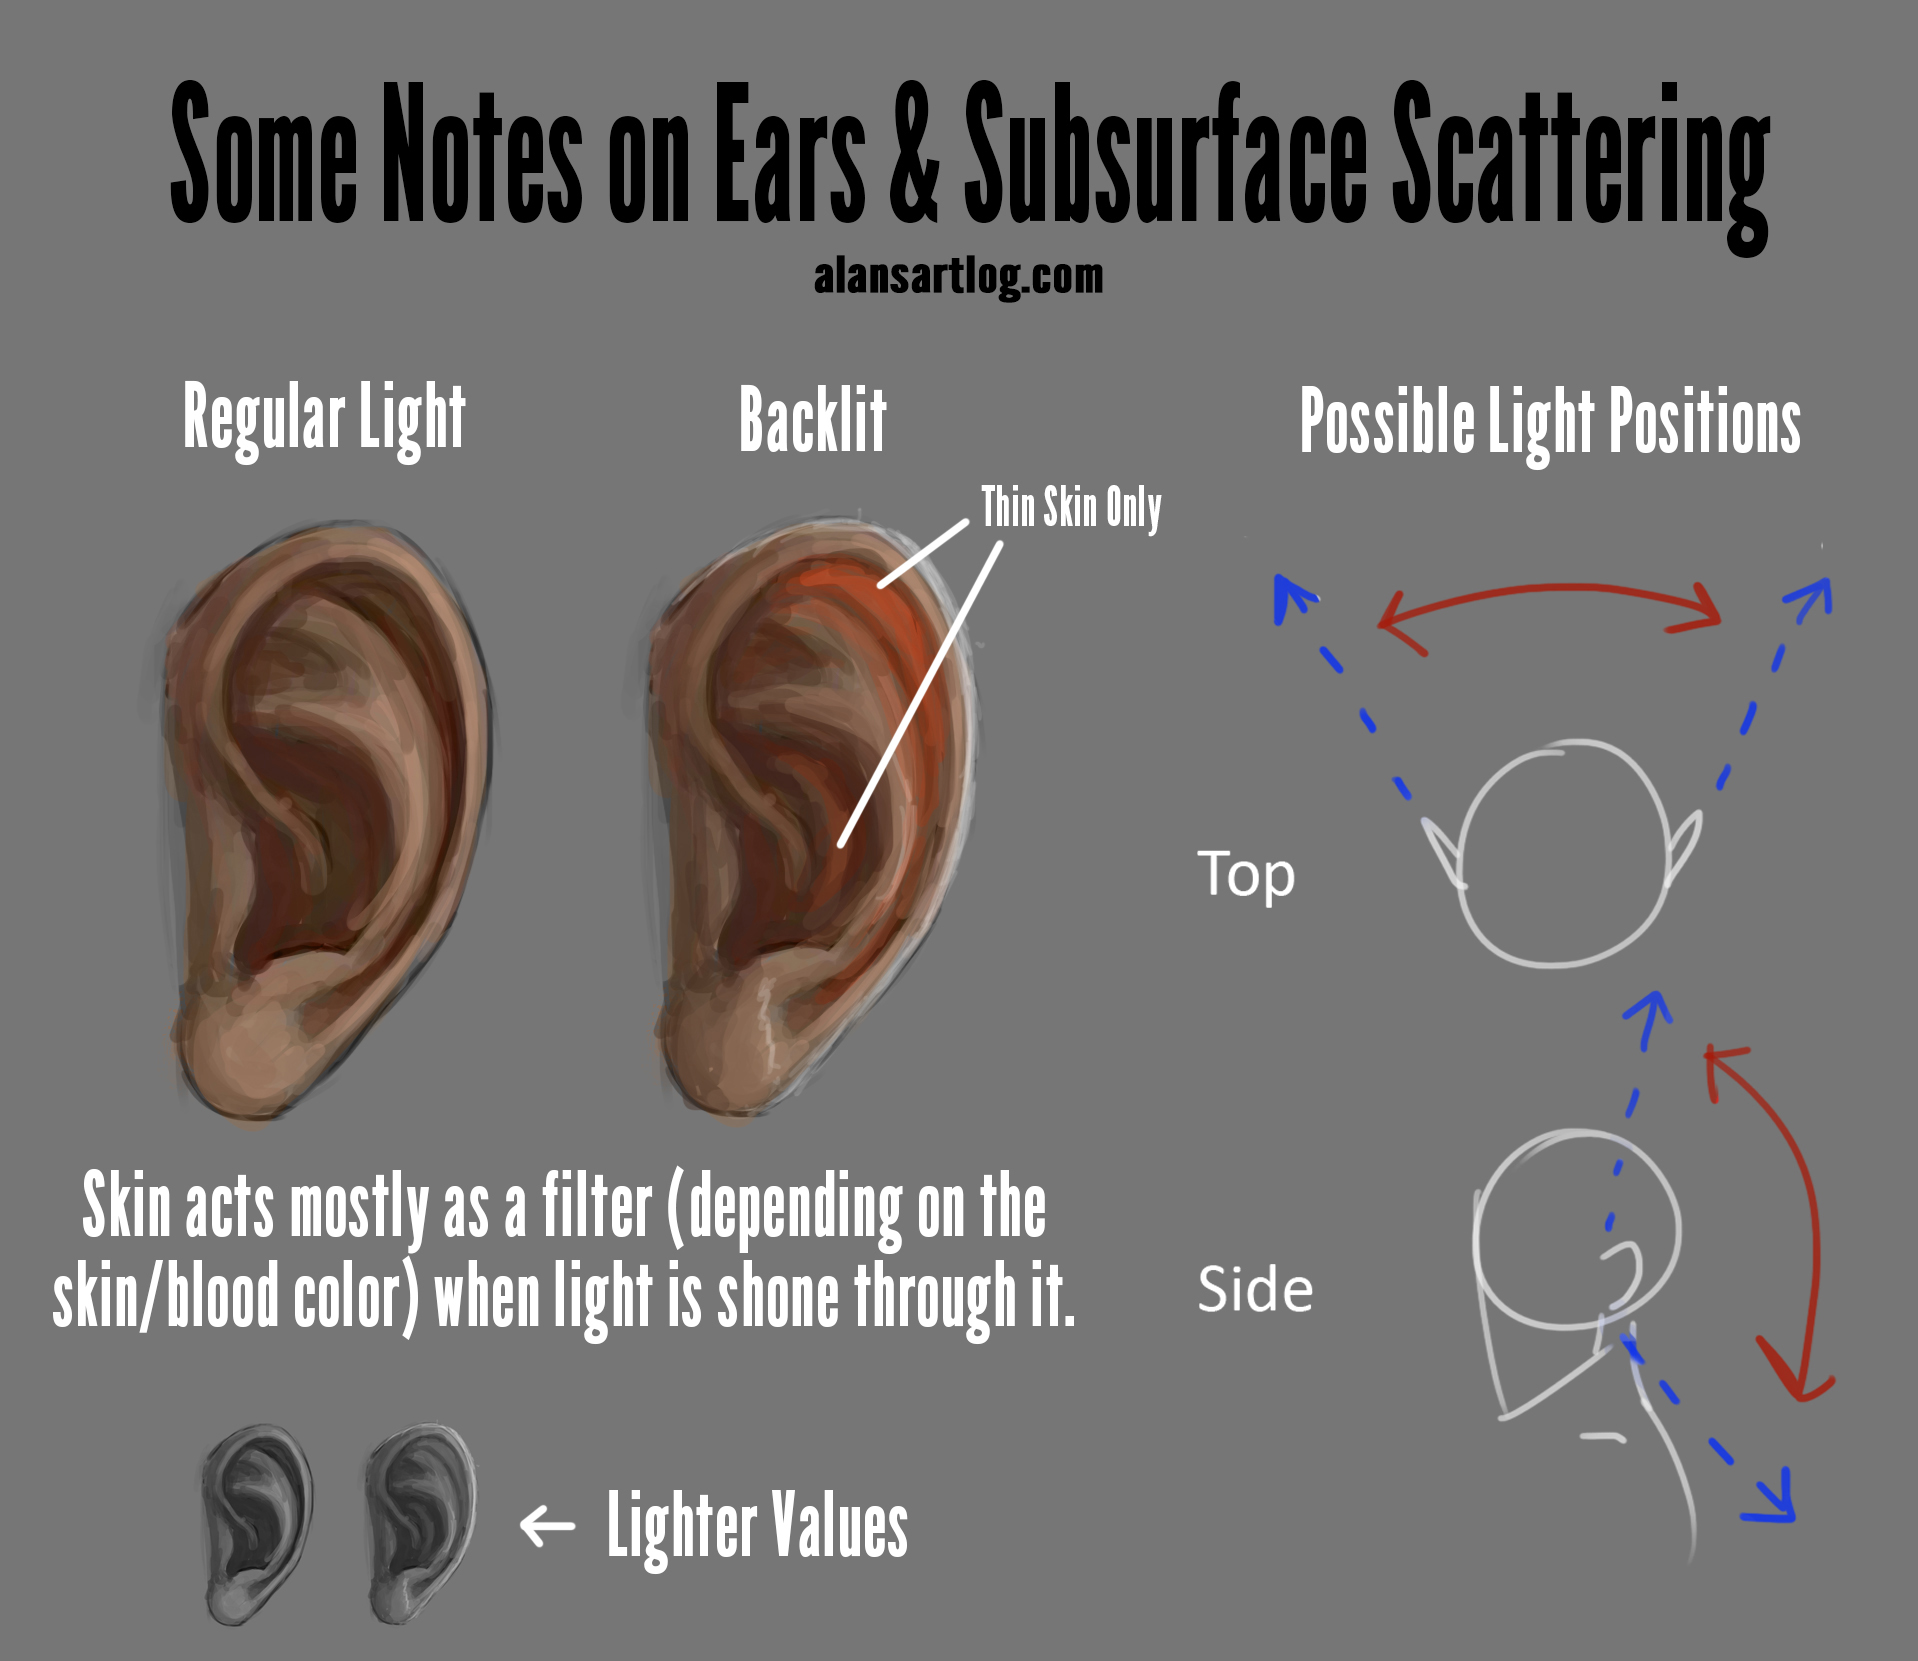
The two ears used for reference in the video where:
“Mean me” by Pierre Vignaue used under a CC-BY 2.0 License / Cropped
“Backlight 2” by Travis Pawlewski used under a CC-BY 2.0 License / Cropped
Below is the chart I rendered. Patreons get access to the PSDs for both files.
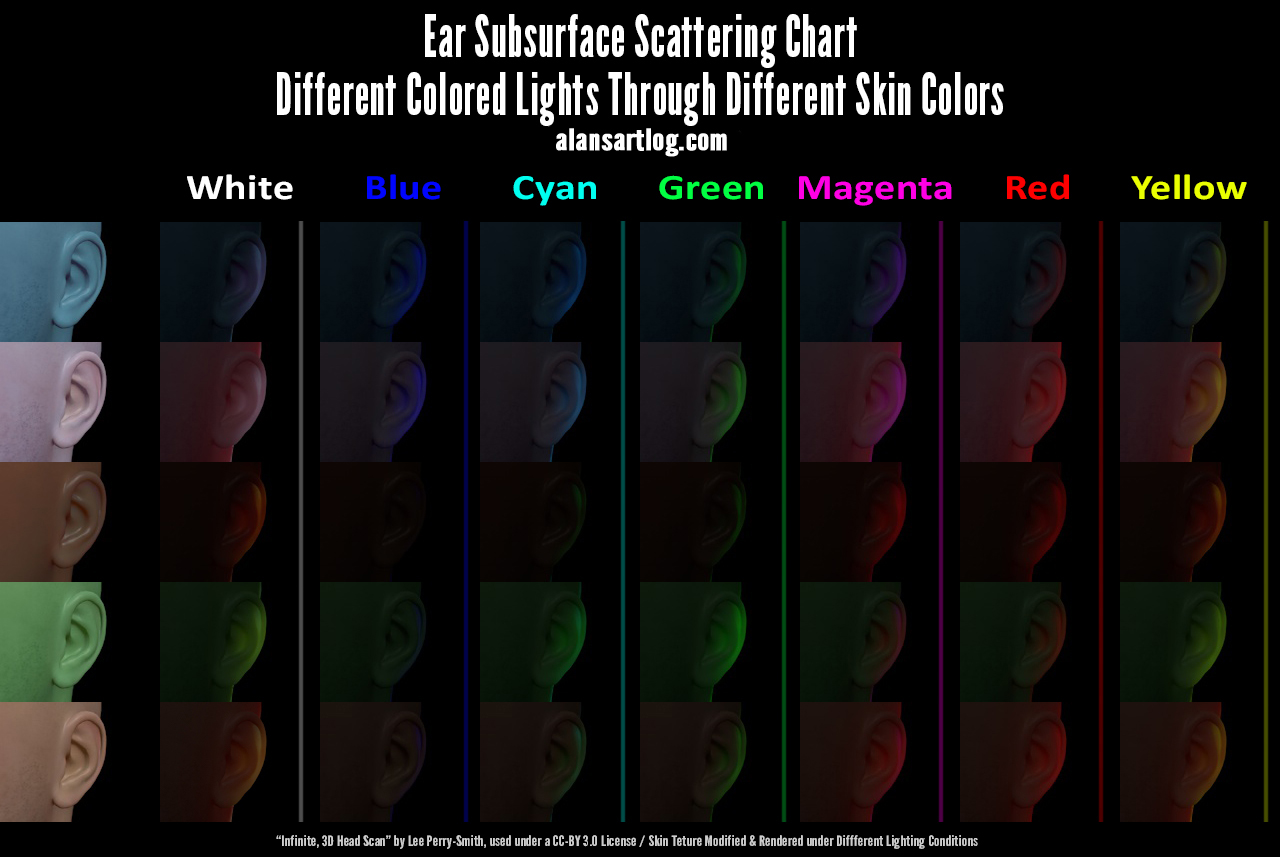
The 3D head scan I used was: “Infinite, 3D Head Scan” by Lee Perry-Smith used under a CC-BY 3.0 License / Rendered under different Lighting Conditions (Click the link there and scroll down to download).
You can download my ready made C4D scene here. In the future these are the types of things that if I heavily modified or made myself will be temporarily patreon exclusive. I’ll also probably use blender, but I’m currently still struggling with it. It doesn’t play nice with my graphics card and setting my own shortcuts has been much harder than I thought. I also still need to learn how to import/export models between programs properly. If you want to open the model and play around with C4D Maxon offers an "unlimited" demo (45 days with saving).
You can also go to Virtual Lighting Studio like I mentioned in the video. You can add multiple different colored lights to that same head (and others) and move their positions around. The only thing you can’t do is change the skin texture like I did, but the site can still be incredibly useful. If you’d like to recreate the scene from scratch or understand more about what I did, there’s this video, and I’ve added the exact details of what I did after the read more.
If you’re interested in learning more about subsurface scattering I came across this post on subsurface scattering, while researching the subject. Traditional artists especially might find it particularly useful.
Setting up the Scene in C4D
3D programs tend to differ vastly on where settings are, but the same basic concepts apply if you want to try to get these yourself. The skin texture must be changed. Subsurface Scattering must be on with the matching color. And you must render with global illumination. There’s a video using this exact same head in C4D like I mentioned, but my exact methods were the following:
Drag the model into a blank scene to import it. It might be huge, reduce it to a reasonable size.
It won’t import with textures or bump maps so you’ll need to add them. Create a material in the material editor, double click on it to open it’s properties. Under Bump > Texture > Load Image import the bump.jpg.
Under Color > Texture > Load Image add the lambertian.jpg. If you’d like to mess around with weird skin colors you can add a Hue/Saturation effect within C4D (I forgot to mention in the video you could do this) or modify the texture outside C4D with a photo editing program. To do it within C4D go again to Color > Texture > Layer this time. It should change the texture to a layer, click on it and it should take you to the shader properties. From there you can go to Effect > Hue / Sat / Lightness. I recommend making a separate material for each skin tone instead of editing the same one for each render.
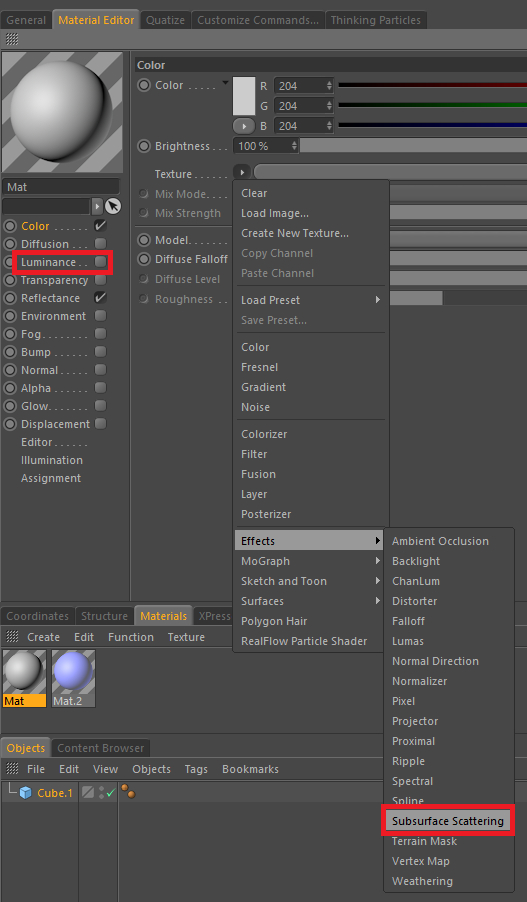
You’ll need to turn on subsurface scattering for each material under Luminance > Texture > Subsurface Scattering and set it to the corresponding skin color (to get back to this section, like you clicked the layer, click on Subsurface Scattering). You will notice there’s already some presets to get you started (Light Skin, Dark Skin). Oh, and one last thing, I also forgot to mention this. you’ll need to adjust the path length to some value between 0-2cm, it will depend on how big you imported the head.
I would advice against using a standard light. Instead make a sphere or any object and a new material for it (and for each color you’re going to test). Turn on Luminance and set it to around 700-1000 depending on the distance. The object color doesn’t matter, only the color of the luminance setting. Note: I found white needs to be a bit brighter to get a similar effect to the other colors. I’m assuming it’s because it contains all the colors, and therefore at the same intensity it doesn’t shine through as much as say pure red.
I also added a soft infinite light at 14% Intensity so you could properly see the ear. Even in dim conditions, it’s rare that you don’t have some other source of light around the figure.
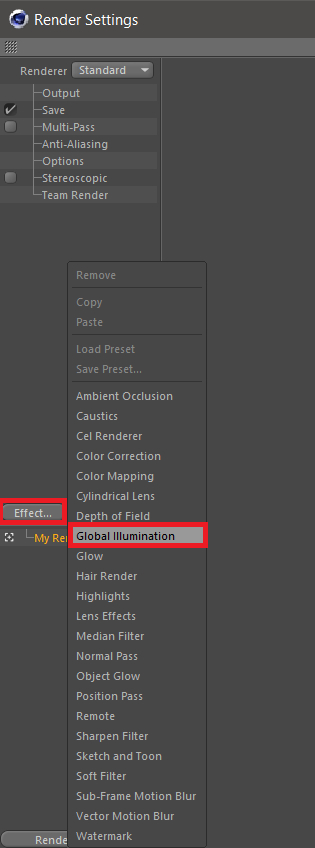
Finally to get all this to actually render in the render settings don’t forget to turn on the Global Illumination under effects. The default settings might be a bit spotty. I’m not an expert with this but I managed to get it to render smoothly and fast by changing the following under Global Illumination.
- General
- Primary Method: Irradiance Cache
- Secondary Method: Light Mapping
- Samples: Low
- Irradiance Cache Record Density: Low
- Smoothing: 100%