Polymer Clay Basics - Part I
So since I read the Imaginative Realism book that I reviewed I started on a head sculpt to have as reference. I had been working on a 3d model of a head before that, but it's not done yet. I thought I'd take the chance to get back into sculpting, plus it's faster than 3d modeling for me still and it's always nice to have something physical. I don't have a 3d printer, so I can't print any 3d models I make, but it's possible to turn a sculpt like this into a 3d model with just a camera and the right software.

I'm still figuring this out. There are apps like Catch123D by Autodesk that can scan objects, but I'm not sure if you can export them or what you're allowed to do with the model. So I've been looking into opensource software but it's quite complicated. There's also problems I think with the object being solid gray which is why you can only really make out defined areas like the eyes, nose, lips, and some of the hair. When I figure it out I'll try to do a step-by-step tutorial.
For now I just want to do this sort of quick intro in polymer clay. In this part I'm going to cover the different types, how to soften it, and how to bake it. The second part will cover armatures, the different ways to bulk them out, and the importance of reference. Finally in the last part I'll cover the different tools I use, how to blend clay, and a real time demonstration of some of the techniques I use. I have these mostly edited, it's just my internet does not handle uploads over 10-15 minutes well, they fail a lot. Also I'm going to be busy so I thought I'd just split them.
Polymer Clay Types
First of all regular polymer clay comes in all sorts of colors. I'm honestly not very familiar with these, they're better suited to things that don't require a lot of detail. If you want more info the glass attic polymer clay encyclopedia has a lot of in-depth information (glass attic: clay types).
I'm more familiar with Super Sculpey which is what most professional sculptors use. The regular Super Sculpey comes in this skin like semi-translucent beige, but I've found it's slight translucency makes it hard to see and it tends to darken a lot when baked. Instead I would recommend a gray clay, it's much easier to see details and it also bakes to a much more consistent color that is easy to photograph. At the time when I bought my clay only Super Sculpey Firm came in gray and I ended up combining my block of Super Sculpey with a block of Super Sculpey Firm to get more of the workability of regular one and the gray color of Firm. Now they actually sell this mix premade as Super Sculpey Medium.
I've also accidentally bought glow in the dark Fimo clay once instead of white (they say "effect" on the package and the effect is in really tiny print in the corner). The white is easier than the semi-translucent beige to work with, but I still prefer gray. And yes the glow in the dark does work. I mixed it into some of the gray clay, and now my head sculpt glows a bit as well.

Hopefully you can see the glow in the dark, it's hard to capture.
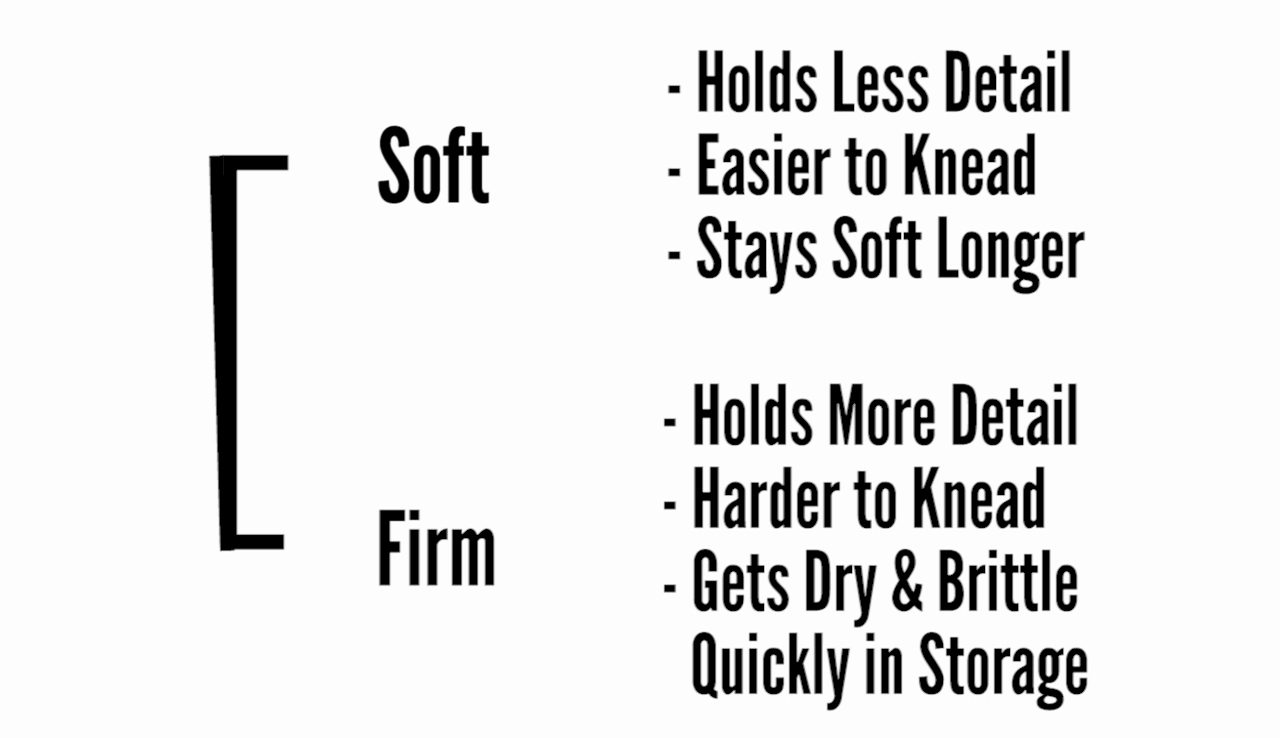
As you might have gathered polymer clay comes in different firmnesses, with the regular multi-colored clays usually being softer and the more professional ones being harder because the firmness determines how well the clay holds details. The harder the clay the more detail, but they also get dry and brittle faster in storage.
My five year old chunk of mixed sculpey has been in storage for a while (I think at least a year, possibly two) and it's hard as a rock.
The good thing though is that you can soften it back up again so long as you never left it somewhere hot because that would bake it. To do so you can buy a softener that they sell or you can use baby oil (or mineral oil). And I double checked this with Sculpey because I had my doubts, but they said that it was the best alternative if you can't find the softener.
Hello.
Thank you for contacting Polyform.
Yes, we recognize that the Sculpey Liquid Clay Softener may not be available in all areas and therefore you can you a few drops of white mineral oil (baby oil) to help soften the clay.
It is always best to use the Sculpey Liquid Clay Softener as this has the same plasticizer as the clay itself, but the baby oil will work.
Alcohol and water do not work as softeners for the clay and will have negative effects on the clay and can cause cracking/bubbles or surface imperfections.
I want to clarify that alcohol should be perfectly fine for using at the end to smooth your sculpt as I will go into detail in the third part, but as they replied above and as I noted in my experiments, it should not be used for mixing with the clay and gives it a really bizzare texture.
Experiments
I have moved these to their own post because it got a bit long.
Somebody also did strength tests on just clays if that's something that's important for your sculpture.
Back to Softening
To start you need to cut your clay into small bits. Mine was already crumbled a bit in the bag. Some put the big chunks in a bag and hammer them. I cut up all the large chunks by hand with an x-acto knife. Next for actually mixing and handling the clay on, having a piece of glass is nice. Usually I just use my glass palette and wash it properly afterwords.
To soften it by hand it's best to chop the clay even smaller, then mix in small batches. Don't mix some, then try to add dry bits to it. It's much harder to then mix those properly. Mix small amounts then put those together.
Now softening it with your hands will hurt, so if you can get a pasta machine that you can pass it through that will help a lot. Sculpey sells one and it's nice that it's stainless steel so it won't rust, but a regular pasta machine will do as well. Now I've heard conflicting info about polymer clay safety, supposedly it's pretty safe, but I would not use the pasta machine or any other kitchen tools for food again without a very thorough cleaning. And again be careful if your pasta machine isn't stainless steel, it will rust if it doesn't dry properly.

Chrome plated steel rusted on third use from pasta stuck where you can't clean it.

Removed the rollers for other pasta types and the top plates of the regular roller. Left the bottom plates (you can't see them) that force the clay/pasta not to stick to the rollers.
After being in storage for a while this one had rusted from bits of pasta that were stuck inside. I cleaned it, put it back together, but this time I removed the top plates so that it's easier to clean.
For actually mixing with the pasta machine I tend to use the thinnest setting and it's best to start out with a small bit that you mixed by hand, because otherwise the dry bits tend to fly everywhere if you just try to pass them through. Flatten that small bit, then lay it across the rollers and add some dry chunks and a bit of softener, then kneed that until it's soft and has no lumps. Repeat until you have enough clay.
To make sure it's properly mixed, especially when doing it by hand, it can be useful to mix in a bit of a different colored clay if you have some, so then you can tell when it's thoroughly mixed.
Now I would suggest you mix only a bit more than the clay you're going to use and for storage I recommend you cut it into long strips or little chunks so it's easier to remove later. I've heard putting it into an airtight container helps prevent it from drying. I'd never really tried it before, I'd always used ziplock bags and they never worked, so I'll be trying putting them in an airtight container and I'll report back in a few months on the results.
Lastly be sure to wash your hands thoroughly after working with the clay.
Baking
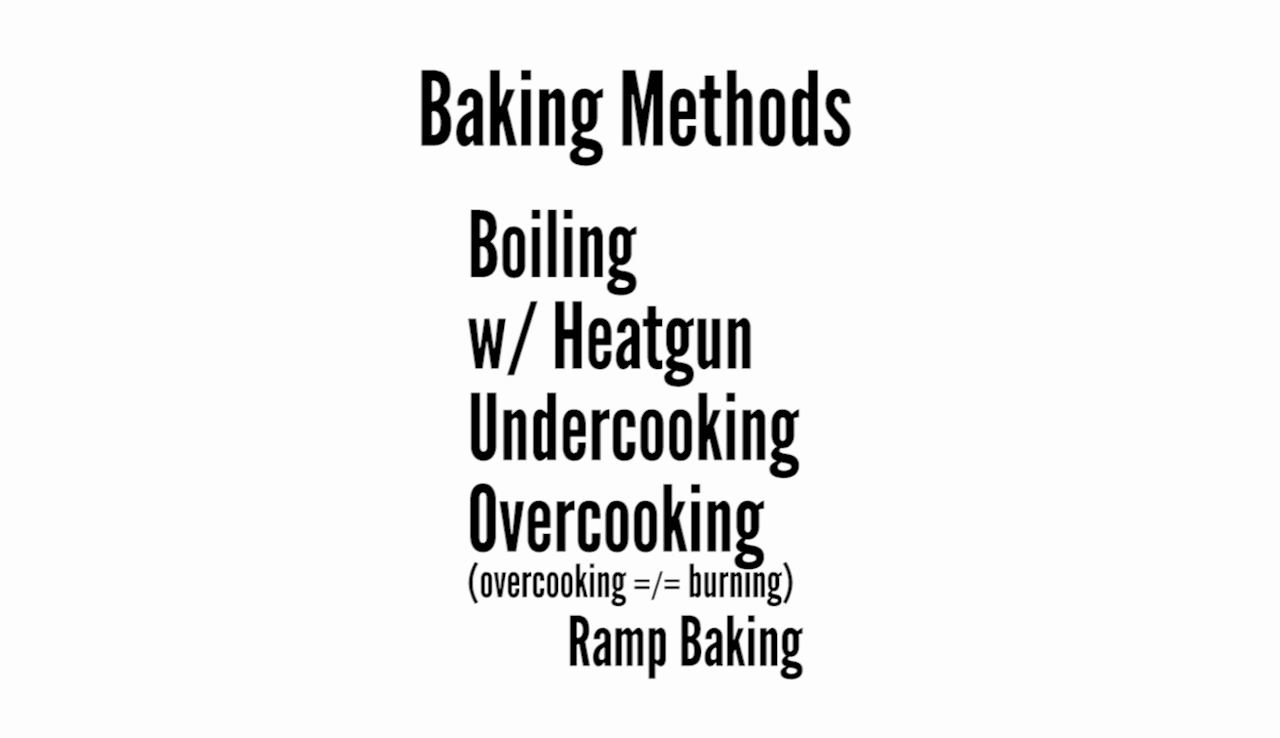
I'll stick to baking it normally in the oven, but I just want to mention that there's many different ways to bake polimer clay. Some people boil it, some use a heat gun, some slowly cook it until it's overcooked and hard as a rock [overcooking =/= burning], some vary the temperatures in a subset of overcooking called ramp baking. It all depends on what you have and your needs. So feel free to experiment so long as you don't burn it.
Now I had always been under the impression until recently that you shouldn't cook it in the oven where you cook food, so I have always used these cooking bags used to cook chickens. I put my pieces in there, squeeze some of the air out because if you don't and a piece shifts it's hard to grab it, then twist the bag and clip it closed.
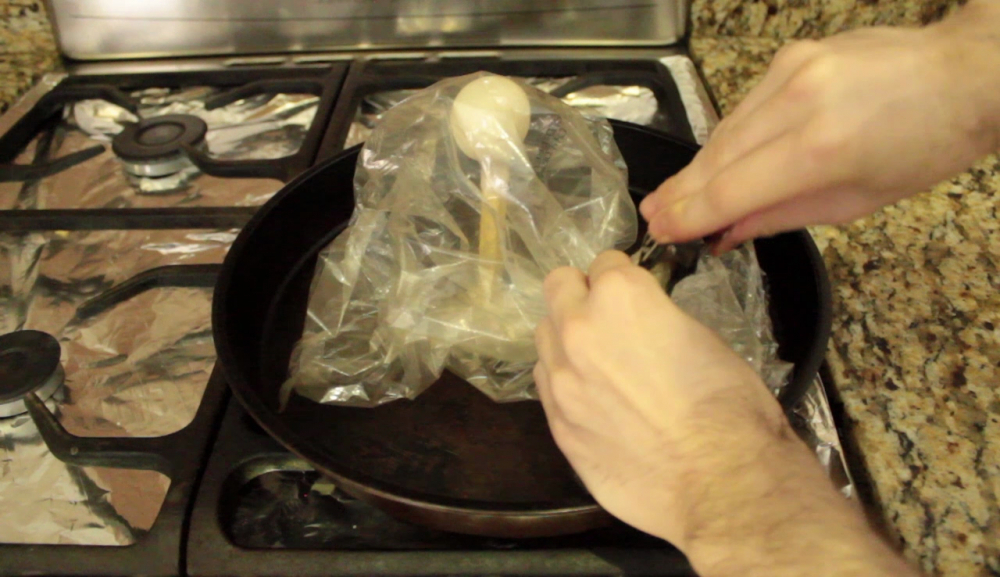
Once it's done cooking, I take it outside, take the clip off, careful it'll be hot, and take the sculpture out of the bag if I can, you don't have to. Just try not to breathe the fumes, then leave everything there to cool. Supposedly though it's safe to cook it without the bag, but it really smells quite awful. This is much easier than having to ventilate the whole room, especially if you cook a lot. The bag can just be re-used over and over again.
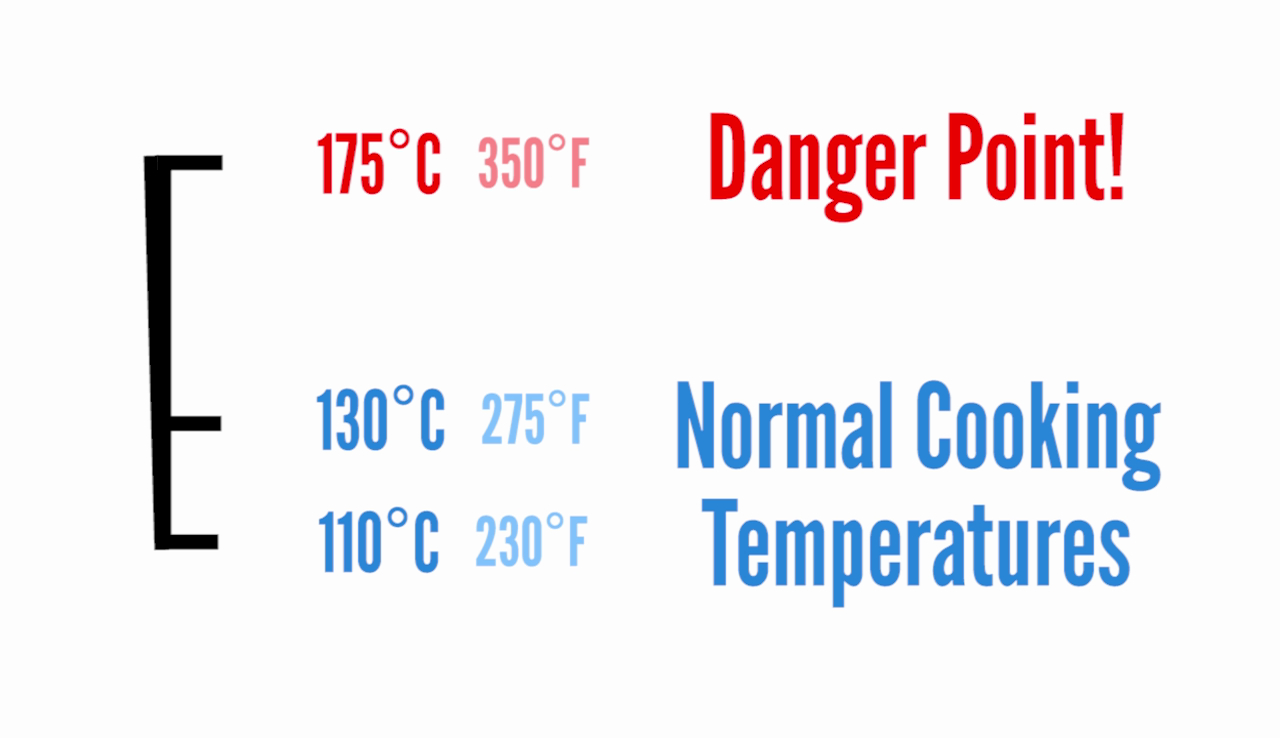
The recommended temperature is 130 degrees Celsius for Sculpey, some other types might say 110 C but it's okay to mix them and bake at 130. The real danger point is 175C where it will burn and release hydrochloride gas. That's quite a large safety margin but if you want to cook your pieces consistently, note that ovens are rarely calibrated right. Get an oven thermometer if you can, or you can cook it at a lower temperature for longer than suggested. Some ovens, like mine, might not even have such low temperatures. I suspect mine is actually cooler than it says, but if yours is warmer you can leaving the door open a bit or warming up the oven first, then turning it off to actually bake the clay.
And yes you can recook it and work in layers, more on that in the second part.
This is it for this part. I hope you found it helpful. If you have any questions leave a comment.